
Wednesday, April 14, 2010
Napkins for Sale
(Ordered direct from Germany)
RM3 per piece
 Wildflowers
5 pieces available
 Roses
RosesSold out!
 Jams
Jams
2 pieces available
 Tulips
5 pieces available
 Lavender
 Herbs
Herbs
 Jams
Jams2 pieces available
 Tulips
5 pieces available
 Lavender
Sold out!
 Herbs
HerbsSold out!
 Peonies
3 pieces available
 Cakes
Cakes
sold out!
 Berries
3 pieces available
To purchase, please sms me at 019-7540000 and I will confirm whether the item you want is still available, the postage rate and will give you the account details for payment.
Happy shopping! Thanks.
Petals & Berries
 Peonies
3 pieces available
 Cakes
Cakessold out!
 Berries
3 pieces available
To purchase, please sms me at 019-7540000 and I will confirm whether the item you want is still available, the postage rate and will give you the account details for payment.
Happy shopping! Thanks.
Petals & Berries
Sunday, April 4, 2010
Mama's Rolling Pin


I should tell you about the acrylic paints that I use. It's none of those fancy brands, that's for sure. That's because I have never had the chance to go for proper classes so I figured I better not waste on expensive paints and just went for some unnamed brand. The colours are pretty funny though (or mind boggling, rather!), cause "burnt umber" is really dark brown and "vermillion" looks orange.. you get what I mean.. so it is pretty challenging to mix them up to get exactly the colours I have in mind.

You can imagine how ecstatic I was when, whilst mixing cluelessly, this sweet green came up to coordinate perfectly with the colours on the napkin I intended to use :o).

By the way, I have some pretty napkins which I have purchased in a pack for my projects, so I have some extras, I'll be putting them up for sale so if you're interested, please check back soon ! :o)
Petals & Berries
Berries on Trivet

I found some wooden trivets being sold pretty cheap. Just what I needed to make some "trial-and-error" projects. Was hoping to skip the "error" part, but hey, no gain without pain :o). I painted the trivet white at first and decoupaged some pink roses on it. Apparently the paint was not fully dry yet (found that out the hard way!), and I accidently tore the napkin whilst applying the modge podge :o( So.. back to square one..

I then cleaned everything up and repainted the trivet a very soft pink and liked it much better. Added some berries, did not want to write anything on it but thought it needed something else. So I added the ribbon and daisies for a country feel.. :o)
Now where shall I hang it? :o)
Petals & Berries
Monday, March 29, 2010
English Garden - Baskets and Wreaths for Sale - SOLD OUT!
A big THANK YOU to my lovely customers :o)
Petals & Berries
Petals & Berries
Saturday, March 20, 2010
English Garden - Baskets and Wreath For Sale

It has been raining the whole day. The plan was to take the kids to the zoo but since the weather is not permitting, it's a perfect opportunity for me to finish up on my craftwork while the kids nap. Some friends have requested to purchase these items but since I made extras, I thought I'd put it up for sale here, if anyone is interested.
First up is a floral wreath,

Flowers you would find in an English garden in springtime.. roses, rananculus, hydrangeas, hyacinth.. with pink and green ribbons..

on a light background.. and a dark background below..

size: approximately10 inch/25.5cm in diameter
RM48
Next is a covered basket decorated with the same yummy roses, hydrangeas, etc., and I also used some cream, pink and green ribbons to wrap around the base..


Sweet and pleasant.. :o)

..it can be used to store a lot of different things.. maybe cutleries or napkins, if you do a lot of entertaining...

size: approximately 12 inches/30cm in diameter,
5 inches/12.5cm in height
RM58
And lastly, a matching little basket..

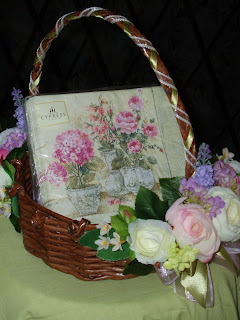
..would be perfect for a garden wedding, carried by a cute little flowergirl.. or just to store your little trinkets.. wait.. do you really need a reason for something this cute?? :o)

size: approximately 8.5 inches/20.5cm in diameter,
3 inches/7.5cm in height (without handle),
10 inches/25.5cm (with handle)
RM38
RM38

By the way, I only have ONE of each, so if you would like any of them, better get your phone now and sms me at 019-7540000..
Happy shopping!
Petals & Berries
Wednesday, March 3, 2010
Baby Boy Gift Basket
A friend requested for me to make a gift basket for another friend's newborn baby boy. I was glad to help cause I love putting together gift baskets. Especially for babies, sweet and precious :o).
My friend left it all up to me and just gave a budget to stick to. I love it when they give me all the freedom to decide :o). I decided on the traditional "all blue" with a transportation theme.

See in the above picture: a soft fleece blanket embroidered with a car, my handmade wet wipes case and my handmade face towels all with trucks, excavators and tractors on it! Funnnn!
 On the right are a set of onesies/rompers with cars on them. Look at those tiny socks! The white one even has a car printed anti-slip sole on it :o) hehe..
Wrapped it all up with blue and white organza material and some really sweet ribbons..

.. and hung a pair of tiny lace-up shoes as a final touch!


If you look real close, there's an airplane printed on the side of each shoe to complete the theme :o) Bliss!!!
Petals & Berries
Wednesday, February 24, 2010
Roses for Sale

I love crafting and if you know me well, you would know that I love trying out all sorts of new crafts.. at least once. Yes, Jack-of-aaaaaall-trades, that's me :o) But the problem is, most of the time "once" is not enough :o) especially if I think I can do better on my next try. So, ever since my first decoupage attempt, a lot of ideas, mostly inspired by decoupage websites and blogs, have been running through my head..
So a couple of days ago, I started working on a sign..
Believe me, I was pretty clueless, I have never attended any classes on decoupage before and I have to tell you, all that I know about decoupage I learned from the internet :o) heee..

It was mostly trial and error, that was why I never even bothered to take a step-by-step photo, as I was afraid it would turn out awful.. :o) this photo was taken after I have already painted the plaque (please don't ask what green it is as I have no idea! I just mixed a couple of greens , some white and some yellow and made sure I had mixed enough to cover the whole project) and applied the roses..
Then I thought it needed some wordings, so I went on the net for some beautiful fonts (this font that I used is known as Old Script..). And the results..


I'm mighty pleased! Far from perfect, I must admit, but I don't think the combination of green and pink and a bunch of sweet cabbage roses could ever go wrong :o)
Petals & Berries
Saturday, February 20, 2010
Floral Wreath

I felt like crafting with some roses this weekend, so last night I sat down and put together some silk roses, hydrangeas, mini apples and a few other fillers that I already had, to be made into a floral wreath.

This is my basketful of stuff :o) I usually throw everything in a basket and match stuff as I go..

I have had this rattan wreath base for..ermm.. I can't remember how long, like many other craft stuff that I have, waiting their turn to be used.. if ever! heee..

And these are the tools of the trade.. pliers for the wires, scissors and my ever faithful glue gun which is showing obvious signs of wear and tear :o)
The plan was just to prepare and put everything together, so I can sit down and make the wreath over the weekend but the problem with me is that when I have an idea in my head I just cannot stop myself :o) So I started making the wreath at about 11 o'clock last night after hubby and the kids have gone to bed..

and finished at 2 o'clock in the morning! :o) Yes.. I tend to be extremely focused when I set my heart on something (and hubby should be very thankful that it's just flowers and not diamonds :o)).

Pink and cream coloured cabbage roses and hydrangeas.. my favourite!

Pink and green satin and organza ribbons.. yummy!
What do you think? Do you like it? Wouldn't it be perfect for your shabby chic decor?:o)
Do you work on your craft until the wee hours too?
Petals & Berries
Wednesday, February 17, 2010
Decoupaged Wicker Basket

I went to a flea market in Singapore a few months ago and bought myself a car load of baskets (well almost!). This is not the type of “flea markets” that sell imitation goods, new items, etc. This is an honest to goodness flea market in the real sense where you have to sift through a mountain of second hand stuff to find the real gems. Some of them covered in inch thick dust and grime. Whenever hubby and I go, we will always make sure we wear comfortable clothes and walking shoes and be prepared to squat (most items are just spread out on the ground) and haggle/bargain. They sell a lot of stuff, from second hand electrical goods to crockery, from baby clothes to grandpa’s walking stick!
This particular trip, I found about 6-7 baskets sold by different vendors and believe it or not, the most expensive was only about SD$4 (for a covered picnic basket) and just SD$1 each for the regular sized ones! Hate me :o). Of course I had to scrub and clean them when we got them home but underneath all that dust they had good structures and are pretty solid too.
I love the texture and shapes and the versatility of baskets. It has many, many uses and can be decorated in many, many ways.
For this particular one, I thought I’d try my hand at decoupage. I googled to see whether there were any particular process that I had to go through to decoupage a wicker basket but came up with none. I know many of you who are good at this, so please just close one eye and pretend that I’m doing it the correct way :o).
 So first I spray painted the basket using DPI’s no.61 blue spray paint. I sprayed on a few layers, letting it dry in between. I have never tried this blue and only went by the colour of the cap on the can which I thought was pretty sweet and matches the paper napkin I intended to use so I was glad when the colour came out quite nice :o)
Once dry, I cut out the napkin to size and removed the layers behind..

 Then I applied some Mod Podge on the surface where I wanted to paste the napkin. After applying the napkin to the area and pressing it down lightly with a brush to remove the air bubbles, I applied a few layers of Mod Podge on top as sealant. I think Mod Podge is wonderful! I see it being used a lot on the net and finally found some in a craft shop when I was in KL. A bit pricey at about RM33 per small bottle, I think, but you can do quite a lot of projects with just one small bottle. They have it in a glossy finish and a matte finish, depending on what you are working on.
This is how it looked whilst drying..

 And since the theme is lavender, how about putting some potted “lavender” in it?
Maybe even add a couple of drops of lavender oil to the inside of the basket so it gives off a wonderful fragrance when you walk by? You are only limited by your own imagination :o) Enjoy!

Petals & Berries
Subscribe to:
Comments (Atom)